Joy’s Christmas Update

Most of my recent blogs have featured my crazy addiction to crochet.  Not so this time.  I’m still crochet mad and have been working on crocheted cowls amongst other things as Christmas presents for many of my friends.  Each one a different yarn and a different colour especially chosen for each recipient.  It’s so exciting.  I look at all these lovely things I’ve made and feel so happy and full of anticipation of giving them, I’ve roped my 13 year old daughter in to help with present wrapping this year.  We’ll have an afternoon together in front of the television watching a Christmas movie, with sweet treats and wrap like mad.

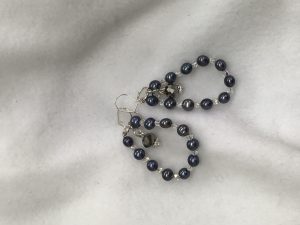
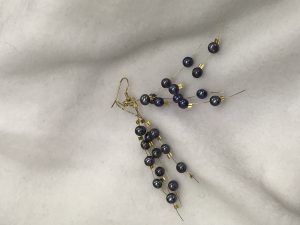
Right now though, I’m making earrings. Lots of earrings.  I’ve blogged in the past about my love for beading and jewellery making and it’s made a bit of a resurgence in my life.  An elderly family friend dropped by the other week with an antique blue-grey freshwater pearl necklace.  She didn’t wear it anymore and could I do something with it?  She wanted to give a gift to each of our group of friends as Christmas presents.

What could I create?  I decided earrings would be the way to go.  I needed to make 5 pairs using the pearls.  One lady needed something lightweight – she had delicate ears.  One lady would need a big and bold pair.  I was going to have to make a pair funky and modern for one of the group and something very sparkly for another.  And of course, there would have to be a pair for me.

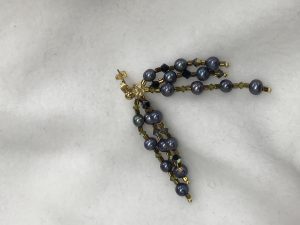
I have raided my stash and have come up with 5 different styles.  I’ve got a simple teardrop with tiny crystals, a bigger teardrop with larger crystals and a crystal charm.  There’s a simple multi stranded affair using just the pearls, a more complex multi stranded pair using crystals and seed beads. And finally a pair with crystals that’s going to look rather like a bunch of grapes.

I’ve used several different techniques – thread and a needle, nymo and tiger tail.

It has taken quite a few weeks but I am finally happy with the end results.  One pair was taken apart twice as they weren’t quite right and I just wasn’t satisfied.  Finding the different styles to suit the intended recipient took a while and quite a lot of research.  I even dug out old design magazines and books as well as using the internet to form the basis of my ideas.

It is so nice creating and making personal Christmas gifts.  That wonderful feeling you get is what Christmas should be about.  Keeping our loved ones in mind and giving a present that is personal and thought out.  Merry Christmas everyone!


Guest Blog – Terry Fletcher

One of our most regular and favourite customers spent some time here on her own working on her projects, and while she was here she wrote a lovely blog post for us! Pop that kettle on and fetch the cake 🙂


‘Another productive day at Tudor Rose. I’m doing a ‘Day Away From Home’ on my own and I’ve cut out, stitched and almost completed the quilting on a lap quilt designed for a Christmas present!

Could I have managed at home? I suppose, but at home I would have felt the need to put on a load of washing, and probably put some tea on as well. This is much less stress! I can lay out the material, and have my machine, the iron, and the cutting table all in the same space. Measure, cut, stitch, and plug in my headphones, find a book, and start quilting. Joy!

This sounds so anti-social, but I also come along with my sister and several friends, usually once a month. We do different things, helping where needed, and it’s all very relaxed. We chat, catch-up, and have a nice lunch in O for Coffee that we haven’t had to cook or clear up. It’s become a regular social occasion for us. And if we run out of cotton – we’re in a shop!’

Purple Boots and The Ocean Wave

I am looking forward to more Powertex workshops as we approach Christmas and I am making lots of new products to tempt you in to one of my courses. This week I have been working on mixed media pieces inspired by the sea. My best friend recently moved to Cornwall and her son is a surf instructor so he has had my ten year old out on the waves while the mums watched and ate cream teas. Then my daughter convinced me I had to have a go and I managed to stand up. I’m am actually quite proud of myself. I always tell my girl she should try things once and then she will know whether she likes it and can politely say nope not for me if she doesn’t. She’s a totally natural surfer, her mother, not so much and no one needs to see me in a wetsuit but I may just give it another try.

Being near the sea always inspires me and I often take my sketchbook out and about when we are on family holidays. I love the ocean especially when it is rough so it made sense to try to capture the feeling of the huge rolling waves. I am experimenting with white Powertex as I really want the colours of the sea to show through. Being a total beachcomber, I always manage to come home with pockets full of sea shells, driftwood and sea glass so I have incorporated some of these pieces into my waves.

Cotton lace and old t shirts are a great medium for Powertex so after applying a base layer of fabric I spent a couple of happy hours sculpting a pair of canvases. I wasn’t sure about how  effective lace would look in a piece of ocean art so I opted for narrow pieces that echoed the waves. Several coats of Powertex were needed over the bulky parts of my work to help them stay in place and then I moved to a layer of colour. What I love about this product is that I can happily make mistakes, either in colour choice or by using too much colour, and these can be rectified with a quick dry brush of gloopiness ready for me to try again. It really takes the fear of making mistakes away as I know I can’t ruin my work.

I had great fun experimenting with these.


Purple Boots x

Shop Update

To everyone who visited the shop and made Sew Saturday such a successful day on 21st October.
Congratulations to Angela Scutchings
who was delighted to win a metre of fabric in our raffle and was one of our first 5 lucky customers to receive a Goody Bag
Newon our website!!

We’ve got some lovely little bargains over on the website. Every little helps in the run up to Christmas!

20% OFF
NEW!!! from Lewis & Irene 
Themed with a selection of fabulous diggers, trains, planes and more …. ‘Small Things on the MoveNOW £10.36 per metre
Offer ends 7.11.17

18% OFF
Anne Smith Designs
Fun little doll patterns with painted faces allow you to experiment with new techniques while creating a toy to be given as a gift or kept for you to admire.
The dolls are no taller that 17″ when finished so they are great for using up scrap fabric. You can try out all sorts of colour ways to put your spin on your doll! 

 NOW £9.00 
Offer ends 7.11.17

Also reductions on the lovely squishy Wendy Supreme Cotton Chunky – pop over and have a look and treat yourself to a bargain.

Purple Boots and the Powertex – Part 2

Back with my Powertex uniform on…well not so much a uniform as my painting clothes! Powertex is designed to make fabric hard so obviously it does exactly that, not so great in your favourite jeans. My ‘out of the frame’ pieces have been so popular and the course is filling up so I have produced another sample to entice you.

My fantasy house is made from a large pickle jar. I love the way this great product lets me upcycle so many things. I start with a design idea – where will the windows and door go, do I need a chimney? After some very careful wrapping, using t shirt yarn that I make with my trusty rotary cutter, I am ready to Powertex. A firm brushing embeds the Powertex into the yarn and forms a great base to build on.

An hour later I have a quirky, individual roof for my house, the door is attached and the window frames are ready for some titivation. Old lace or crocheted doilies are spot on for this part of the project. A little drying time and my house is ready for colour. Today’s decoration is teal and purple but Powertex can be coloured in lots of different combinations.


Why not come along and make your own? Your house could soon be living at the end of the garden for the local fairy population, or go darker and make it appeal to some hobgoblins, perfect for the Halloween doorstep. Because my houses are built around a jar, just add some battery powered fairy lights for a whole new effect.

Next project is a seated figure. Perfect for a spot in the garden. Best get my thinking cap on.

Join Purple Boots for her Fantasy House workshop on Wednesday 29th November.

Click here to book online.

Purple Boots and the Powertex


I have been having lots of fun this week experimenting with our new range of Powertex products. Having worked with a visiting Powertex tutor I took myself off to Powertex UK to learn more about this exciting product.

Powertex fabric hardener and textile hardener is an environmentally friendly water-based liquid sculpting medium. It can harden absorbent materials such as textiles, paper, cardboard, fabrics, leather and fiberglass and can be easily combined with self-hardening clays, concrete, stone, ceramic, wood, sand and Stone Art.

Over the summer I have been collecting a range of materials to recycle as Powertex offers masses of opportunities for ‘green’ crafting. I have turned many old t-shirts into t-shirt yarn which we will come in really useful once I move onto bigger figures. Old jewellery is also a great resource, broken necklaces and old buttons and beads. I also discovered some lovely but stained old crocheted doilies in a charity shop and these too will be getting the treatment.

As a way of introducing Powertex I am running a course called Out of the Frame. 
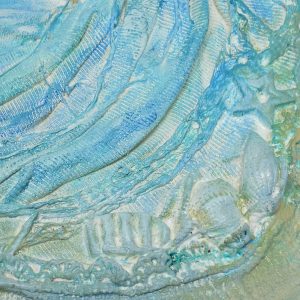
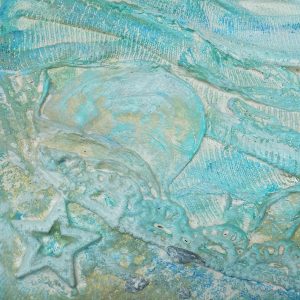
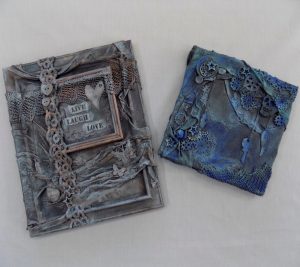
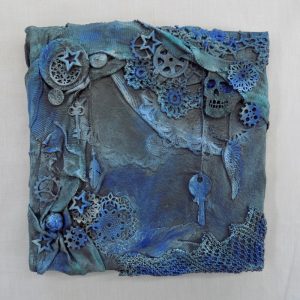
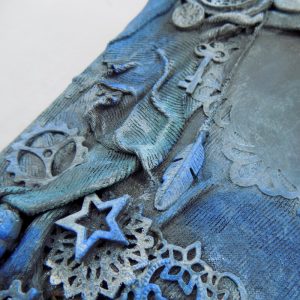
This week I have been busy making the samples. First I covered my base materials – old frames and canvases – with some of those recycled t-shirts then I got creative. Powertex is absorbed by the fabric but takes some time to become hard so it allows for lots of opportunities to change my mind and reposition the elements of my designs. In order to get some elements to adhere you need a little patience and some jiggery pokery with scraps of lace and paper.


Time for a brew and step back for half an hour, and now the pieces I have been working on are well on the way to dry. At this point I need to pick a palette of colours for each piece I’m working on. Steampunk is gradually turning into shades of blue while my fantasy frame is a little more subtle with metallic shade.

Unlike other coloured media you cannot go too wrong with colour on Powertex pieces. If it’s too strong I simply take a little Powertex on my brush and blend it over to soften the effect. A little patience, a little layering, and I am done.


Now….fairy houses….hmmm!

Purple Boots x


FREE Patchwork Slippers Knitting Pattern

A delightful design – these slippers are easy to make. They fit your feet snuggly and best of all, they are very portable. Just fold them up and take them on holidays.

Materials:

3.75mm needles

100g of any double knit yarn.

Suggested yarns:

Stylecraft Life DK 100g – 75% acrylic & 25% wool

Stylecraft Highland Heathers – 100% acrylic

Adriafil WoCa – 70% wool & 30% hemp

Adriafil Knitcol 50g – 100% merino wool

Sizing:

The sizing of the slippers is altered depending on how many stitches you cast on and how many rows you work for each square.

Ladies Size 4        Each square should measure 3”. Cast on 16 stitches and work 19 rows

Ladies Size 5        Each square should measure 3 ¼”. Cast on 18 stitches and work 22 rows

Ladies Size 6-7    Each square should measure 3 ½”. Cast on 19 stitches and work 26 rows

 Stocking Stitch Square (make 4)

Cast on according to size.

1st row: knit

2nd row: purl

Repeat until you have completed the correct number of rows for your size.


Rib Stitch Square (make 4)

Cast on according to size.

 1st row: K1, P1 to end of the row

2nd row: P1, K1 to of the row

(Each row starts with the same type of stitch as the last row ends on)

Repeat until you have completed the correct number of rows for your size.

Moss Stitch Square (make 4):

Using the same technique that helps form the rib stitch, you can knit this striking effect. Moss stitch is essentially a 1×1 rib stitch.

Cast on according to size.

1st row: K1, P1 to the end of the row

2nd row: P1, K1 to the end of the row

(Each row starts with the opposite type of stitch as the last row ends on)

Repeat until you have completed the correct number of rows for your size.

 Making up:

 Step one:

Take 2 of each square to form each slipper, and sew together as in the photo. Two stocking stitch squares form part of the slipper base. Two ribbed squares form the base and sides. Two moss stitch squares form the heel and front of your slippers.

Make sure that you sew in the ribbed squares exactly as the picture shows so that the cast off edges form part of the opening of the slipper.

 Step two: 

Take the two moss stitch squares and sew to the edges of the stocking stitch squares as shown. You have now formed the heel and the toe. Now take one of the moss stitch squares only. This will form the front of your slipper. Sew up a third edge to the side edge of the ribbed square. Now sew up the fourth edge to the edge of the other ribbed square.

Finishing – To edge your slipper, crochet a chain around the opening of the slipper, or make an i-cord and sew around the opening.

I-Cord:

Step 1: Cast on a few stitches. I-Cord is usually made using 3-5 stitches.

Step 2: Knit one row

Step 3: Do not turn the work, just slip your work to the other end of your double

pointed needle. Your working yarn will be at the “wrong” end of your     work.

Step 4: Pull the working yarn tightly along the back of your work and knit the

next row.

Step 5: Repeat steps 3 and 4 until you have an I-Cord that will fit around the slipper opening with a slight stretch. Sew in place.

Decorate with buttons as we have done or embroidery, beads, ribbon. There are endless possibilities.

FREE Loopy Scarf Pattern

This unusual looking scarf takes approximately one hour to make. Perfect for whipping up an evening, or in a long queue!

Requirements:

One set of 15mm straight needles

Cygnet Seriously Chunky Prints,  or Stylecraft Merry Go Round Super Chunky.

Loop st: Insert needle into stitch knitwise, wrap yarn around needle twice. Pull yarn through, and leave both loops on right needle. Slide stitch off left needle.

Instructions:

Using 15mm knitting needles, cast on 5 sts.

Row 1: Loop st across all 5 sts.

Row 2: K all sts, treating each loop wrap as 1 stitch.

Repeat rows 1 and 2 until the scarf is the length

required, or you have 30 cm of yarn remaining.

Cast off loosely.

Making up: Wrap scarf around neck, and pull

through a central loop near end of scarf to secure.

We’ve knotted the ends of our scarf just to give it a little extra weight at the ends!

This pattern can be adapted to any yarn.  Our

recommendation is to use needles larger

than the yarn indicates and that the yarn should

have some variation in it.  The number of stitches

can also be altered till you get the width you need, although wider scarves will use more yarn!

Project Linus Update

We’ve received a wonderful message from Elaine, who distributes our Project Linus quilts. She’s had some thank-you emails, along with some lovely photos of happy recipients!

” ‘Since you came into St Johns and dropped off the blankets there has been a real special buzz on how well they are supporting the children in 
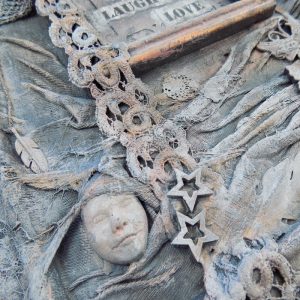
such a large variety of ways.

We separated the blankets into Seniors and Primary and each blanket has found a home with individual students for them to use during their school day. The blanket belongs to the student and will travel up with them through out their school life(which is perfect for this time of year when the students are going through such changes) and if the blanket last long enough will go with them into adulthood.

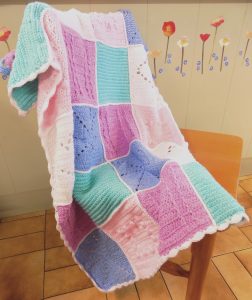
I’m so pleased I responded your email as the benefits seen in the students from having one of the beautiful hand-made blankets is so warming.

Please pass on my thanks to all the amazing members of the project who produce these beautiful items.

Thank you and take care
Faye’

A second thank you came from Bedford Hospital

‘I just wanted to say a huge thank you for the beautiful hand made quilts we have received on Riverbank Ward to use with the children here.Each one is a work of art and will be carefully placed with a child who I am sure will cherish it forever. It is such a lovely idea, thanks to you and your team for spending the time creating and making these beautiful items.
I’ve only just seen them today but felt compelled to email you immediately!
Anne’

And a third one from a Women’s refuge that Kathy specifically wanted to 
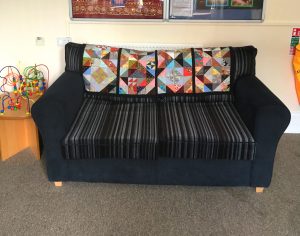
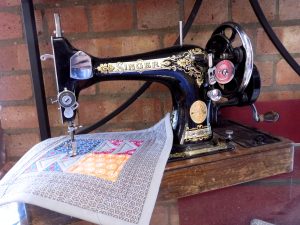
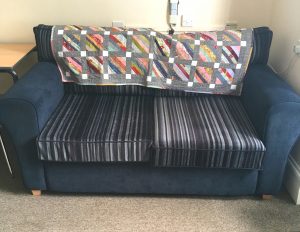
give some quilts to, after Ruth’s visit to our last meeting at Tudor Rose. the quilts had been sitting on the top of her wardrobe (as you do) and they have now found a new home

‘I just thought you may like to see two of the larger quilts in situ. They go beautifully with the colour scheme in our residents lounge. If you can pass on special thanks to Kathy too please. I haven’t managed to get our handyman to put up the ones for the wall yet, but I will send you a picture when I do.

Ruth’

So thank you all so much, it’s a pleasure to be able to spend time together at the Tudor Rose making the quilts and then deliver them around Bedfordshire and to see how grateful everyone is when I show them what I have brought them and they obviously get pleasure in passing them on to the children.
Enjoy the summer and see you all in September.

Regards,
Elaine”

Project Linus is a fantastic charity who distribute comfort blankets to disadvantaged and sick children and teens. You can find out more about their valuable work HERE

Want to contribute? Find out all about our upcoming Project Linus days HERE

Pixie Dust Crochet Along Blanket

PIXIE DUST (NOUN)

A substance or influence with an apparently magical effect that brings great success or luck.

Origin: 1950’s. From the magic dust that enabled humans to fly in J. M. Barrie’s Peter Pan

We’re so excited to be announcing our very first Crochet Along! We will be officially launching for The Festival Of Quilts at Birmingham NEC from 10th – 13th August (we’re on Stand E3), but you can sign-up online now ready to receive your first installment on 15th August. When you buy the bundle at the special price of £20.00 you will receive a free pattern every following 2 weeks for 10 weeks. The end result is an adorable baby blanket or throw, use it in the pram, pushchair or car seat.

The blanket is made in the beautiful, soft Peter Pan Pixie yarn. The patterns are aimed at beginners and build each week on the skills you learnt the week before. However, this is a simple pleasure for the more experienced crocheter.

The pattern is utterly flexible, you could change the colours, increase the size, change the yarn. Make it for a friend, a child, a teenager, an elderly aunt…

You will need a 3.5mm crochet hook, scissors and a knitter’s needle, and the size of the finished throw is approximately 91.5 x 68.5 cm (36 x 27″).

Sign up and join in here: Pixie Dust CAL